Loading... Please wait...


Q & A
Grout Guide: How to Remove Damaged Grout
Posted on

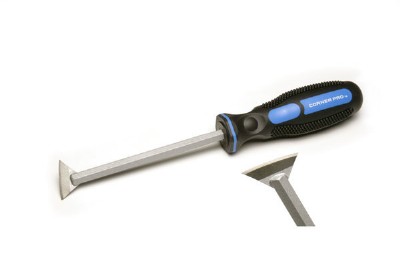
You are going to need a Grout Getter that has a triangle blade for removing sanded tile grout, or a Grout Getter that has a diamond blade for removing non-sanded tile grout (1/8" and smaller grout joints).
You may also need a strong utility knife. Depending on where you are scraping, some areas are hard to get to, like tight corners where the Grout Getter cannot access. The utility knife or screwdriver will be useful in removing grout from those areas.
Put one of the points of the carbide blade on the grout and push forward. Don't be afraid to get aggressive and you'll feel how the blade works. Put both hands together on the handle and let the Grout Getter slide forward. Sometimes it will stick but that's ok, just back up a little and take less of a bite out of the tile grout and continue.
When you approach a grout intersection, ease-up and carefully pass the intersection without chipping the tile corners. You want to remove the grout about 1/8" or more below the top edge of the tile to give room for the new grout.
The carbide blade will slide along the edge of the tile or the glaze without scratching when used properly. Too much force on the edges can remove glaze so start slowly at first to get the feel for how much pressure to apply.
After you learn you'll be confident to remove damaged or discolored tile grout anywhere!